

How To Enable The Virtualization In Windows 10
2 Ways – How to Enable Virtualization in Windows 10 [MiniTool News]
Past Tina | Follow | Terminal Updated
Summary :

If the virtualization in Windows 10 is disabled, you may need to enable it. Do yous know how to enable virtualization in Windows 10 or how to enable virtualization in BIOS? This post from MiniTool shows 2 means to enable virtualization Windows 10.
CPU virtualization is a hardware feature constitute in all current AMD & Intel CPUs that allows a single processor to deed every bit information technology was multiple individual CPUs. CPU virtualization allows the operating system to utilise CPU more finer and efficiently on the computer then that it makes the estimator fast.
CPU virtualization is also the requirement for many virtual motorcar software since it is able to brand them run normally. And so, many users would like to enable virtualization Windows 10.
However, some of them do not know how to enable virtualization in Windows x and inquire for help. So, in this post, we will prove how to enable virtualization in Windows x.

When opening the virtual machines using VirtualBox, you may run across the VT-x is non available fault. This post shows how to fix this trouble.
2 Means – How to Enable Virtualization in Windows ten
In this department, we will elaborate on 2 ways to enable virtualization in Windows ten.
Enable Virtualization Windows 10 in BIOS
As nosotros have mentioned in the higher up role, virtualization can be enabled in BIOS. And so, we will show you how to enable virtualization in BIOS.
Now, here is the tutorial.
- Power off your computer.
- Then press the specific hotkey to enter BIOS. The hotkeys may vary due to unlike brands. It usually is Esc, F2 or Del, etc.
- Then navigate to the Advanced tab, press Enter to continue.
- Select Virtualization and enable information technology.
- After that, save the changes and reboot your computer.
Once all steps are finished, you have successfully enabled virtualization in Windows 10.
Enable Virtualization Windows ten in Settings
Also enabling virtualization Windows 10 in BIOS, you tin can also choose to enable virtualization Windows ten in Settings.
Now, here is the tutorial.
1. Earlier proceeding on, yous need to cheque whether your reckoner has enabled virtualization Windows 10.
2. Open Task Manager, and go to the Performance
iii. On the bottom right, you can run across Virtualization and check whether it is enabled or disabled.

4. If yous find that the Virtualization is disabled, y'all can go on your reading to find how to enable Virtualization in Windows 10.
five. Press Windows key and I primal together to open Settings.
vi. Choose Update & Security.
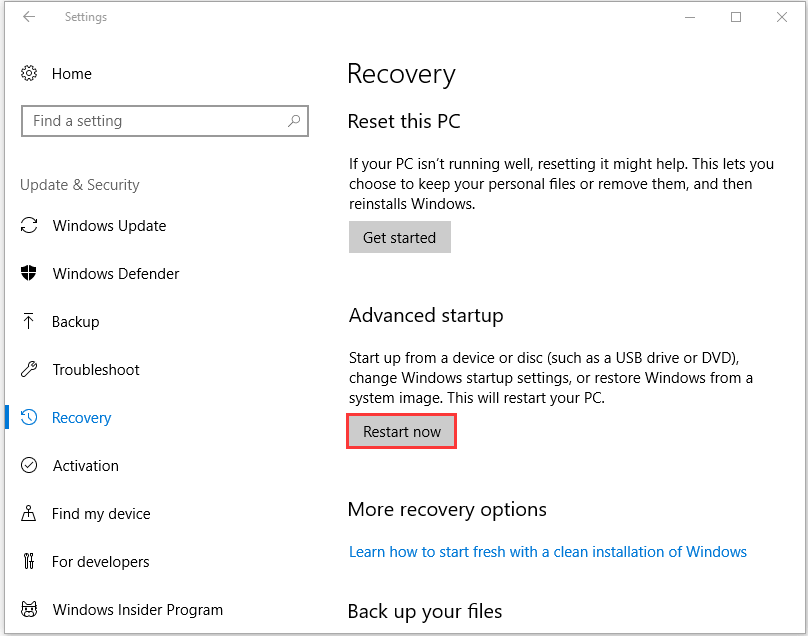
7. In the popular-upward window, navigate to the Recovery tab on the left panel.
8. In the Advanced section, click Restart now.
nine. Y'all volition enter the Windows Recovery Surroundings. Click Troubleshoot > Avant-garde options > UEFI Firmware Settings.
10. Then click Restart now to keep.
11. Next, you will enter the BIOS settings.
12. Select the Virtualization and choose to enable it.
Once all steps are finished, you have successfully enabled virtualization in Windows 10.
Related article: How to Set UEFI Firmware Settings Missing Windows 10
Final Words
As for how to enable virtualization in Windows ten, this post has shown 2 means. If yous want to enable virtualization Windows x, yous can endeavor those ways. If you have any unlike idea of enabling virtualization Windows x, you can leave a message in the comment zone.
Source: https://www.minitool.com/news/enable-virtualization-windows-10.html
Posted by: harrellforrie.blogspot.com
0 Response to "How To Enable The Virtualization In Windows 10"
Post a Comment